

- Description
- Specs
- DOCUMENTS
- features
The strain relief and 2” handle for the HS582i transducer has a gland which clamps around the cables to provide additional strain relief and protection from water, couplant and debris ingress to the probe connector.
Reduce inspection time with no duty cycling and robust calibration.
Dual element ultrasonic transducer for high-temperature, in-service thickness, corrosion and erosion surveys for use in applications across refining, oil & gas, energy, nuclear, aerospace and process sectors.
HotSense™
- Built on the award winning HotSenseTM ultrasonic platform powered by the proprietary Ionix HPZ Piezo-ceramic, and offering increased heat resilience
- Dual element thickness gauging transducer for use through -55 to +550 °C [-67 to +1,022 °F] wide temperature range for in-service assets
-
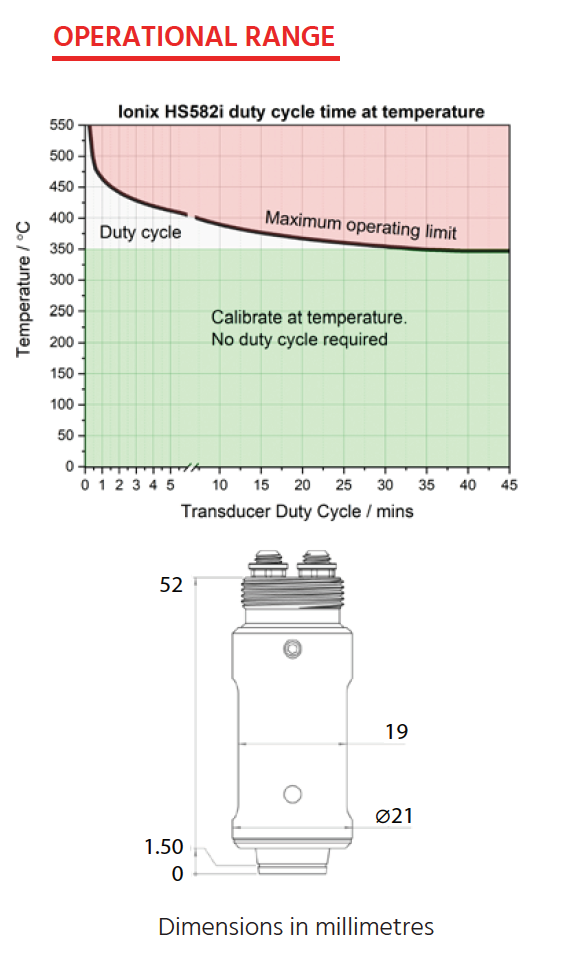
Reduce inspection time with no duty cycling or cooling up to +350 °C [662°F]
maximizing productivity and minimizing down-time or outages with in-service
inspection
APPLICATION
- Measure remaining wall thickness from 1 to 500 mm with compliant thickness gauges on hot assets, in-service, without shutdown or isolation
- Better data from easier and more accurate calibration at asset temperature
- 2X increased wear resistance for the most extreme environments and applications including scanning and corrosion mapping
- Range of accessories available, including port inspection wand and safety guards for the most extreme temperatures
- Compatible with industry standard ultrasonic gauges and flaw detectors
- Compliant to EN 12668:2 and ASTM E/1065 to meet existing asset integrity UT procedures
HS 582i TRANSDUCER SPECIFICATION
| Parameter | Value | Unit |
| Surface temperature range* | -55 to +550 / [-67 to +1022] | °C / [ °F] |
| Storage temperature | -55 to +80 / [-67 to +176] | °C / [ °F] |
| Tip diameter | 11 / [0.434] | mm / [in] |
| *Custom geometries available on request | ||
| Connector Type | Dual UNF 10/32 Microdot | |
| Ruggedisation | Weatherprood stainless steel construction | |
| Transducer centre frequency | 5.0 | MHz |
| Active element diameter | 8.0 / [0.315] | mm / [inch] |
| Wear allowance | 1.5 / [0.06] | mm / [inch] |
| Acoustic characteristics certificate of conformity supplied with each | ||
*See duty cycle chart for use. Requires compatible couplant
**For other specification requirements please contact our sales team
MEASUREMENT RANGE
| Parameter | Value | Notes |
| Range in Steel | 1 to 500mm / [0.04 to 20"] | with compatible gaug |
| Echo to echo range | 2.5 to 50 mm / [0.1 to 2”] | in steel |
*Compatible with industry standard UT gauges and flaw detectors


